Intro
This post is a guide to setting up a virtual machine (VM) for various Linux x86_64 programs in the ADCP suite, now provided in a self-contained micromamba environment.
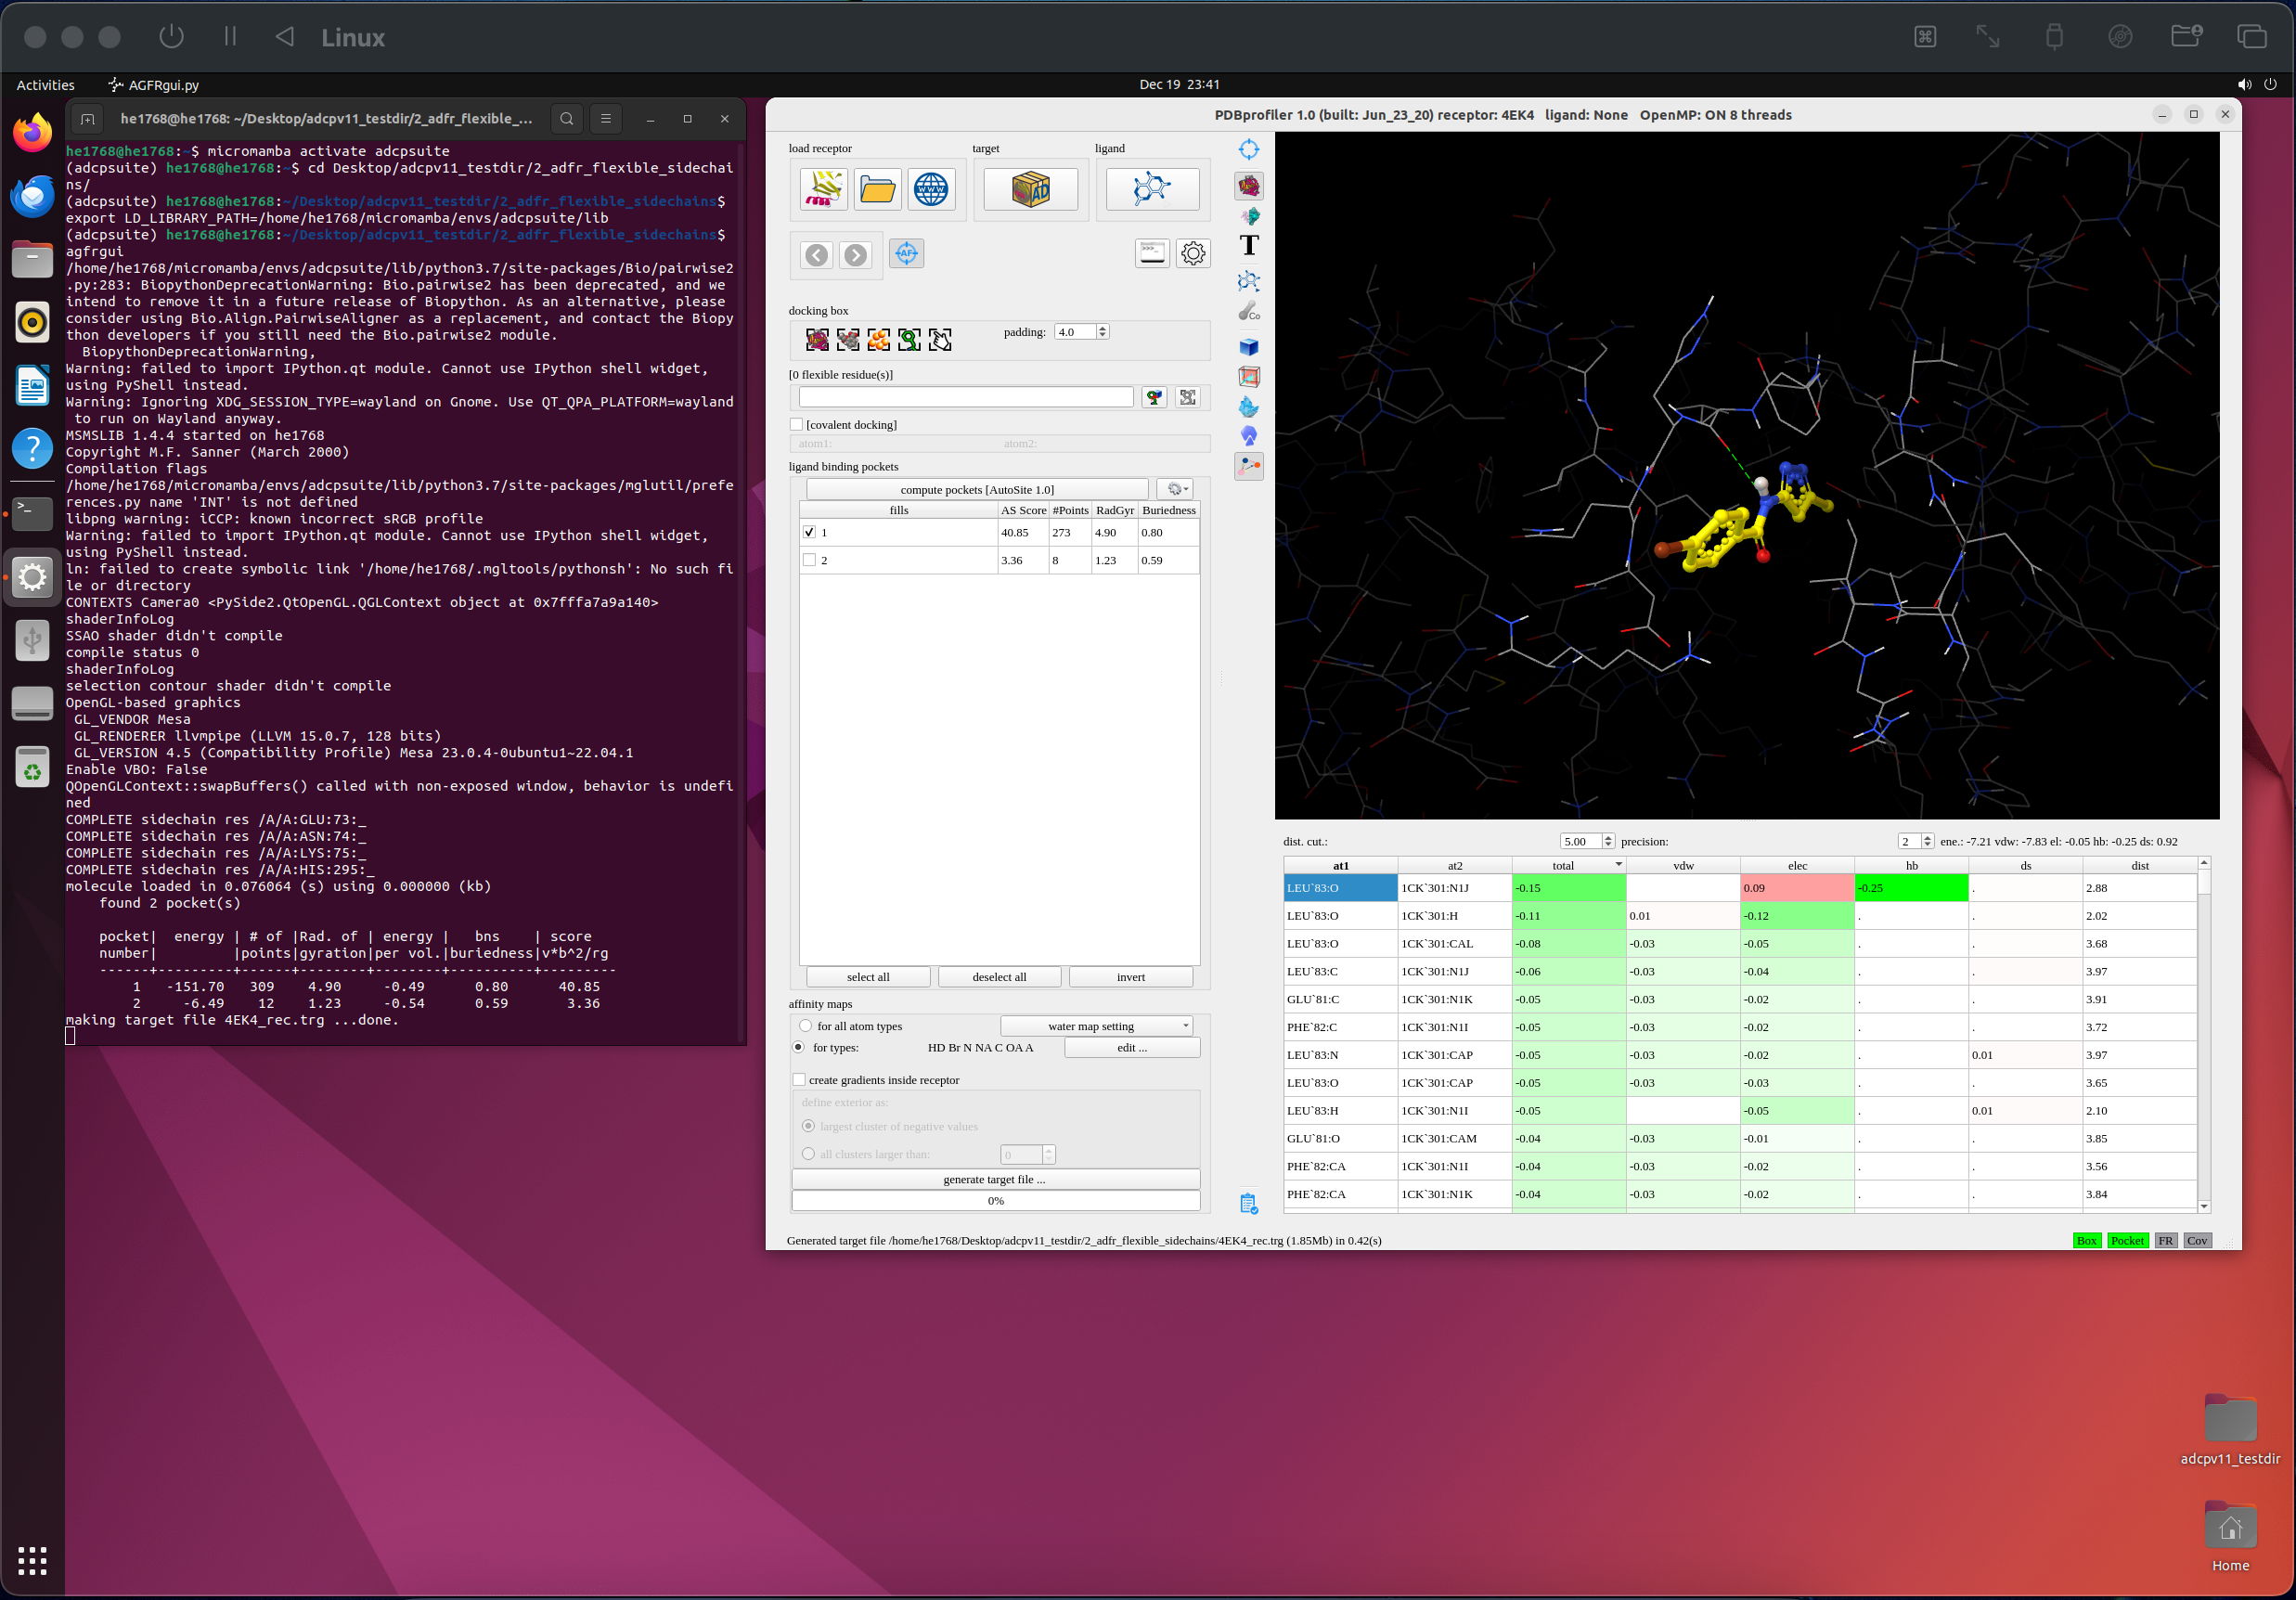
Following the outlined instructions, a desktop will be installed for the VM. Graphical programs such as AGFRGUI can be used through the desktop. Furthermore, on Mac computers with Apple Silicon (M1/M2) that use the ARM64 architecture, Rosetta can be enabled within the ARM64 VM as a compatibility layer to run the AMD64 (x86_64) programs.
This post is adapted from a previous post on running the ADFR suite and ADT in the same setting, with the add-on of configuring an environment containing AMD64 Python packages using ARM64 micromamba, to minimize the amount of emulation for better performance.
Table of Contents
- Step 1: Setting up a Ubuntu VM in UTM
- Step 2: Enabling Rosetta
- Step 3: Enabling the Multiarch and Multilib Support
- Step 4: Installing micromamba, the ADCP Suite and reduce
Step 1: Setting up a Ubuntu VM in UTM
UTM is a free application to create virtual machines on Mac with support for Apple Silicon. Ubuntu is a free, open Linux operating system that we will be using for our VM. To begin with, we will set up a Ubuntu VM in UTM with the desired features to enable Rosetta emulation.
Download UTM and the disk image (ISO file) of Ubuntu-for-ARM
UTM (Version 4.3.5) - https://mac.getutm.app/
Ubuntu (22.04.3-live-server-arm64) - https://ubuntu.com/download/server/arm
Set up the VM from UTM
From UTM - Create a New Virtual Machine > Virtualize > Linux.
In the option tabs -
- Turn on the two features: Use Apple Virtualization, Enable Rosetta.
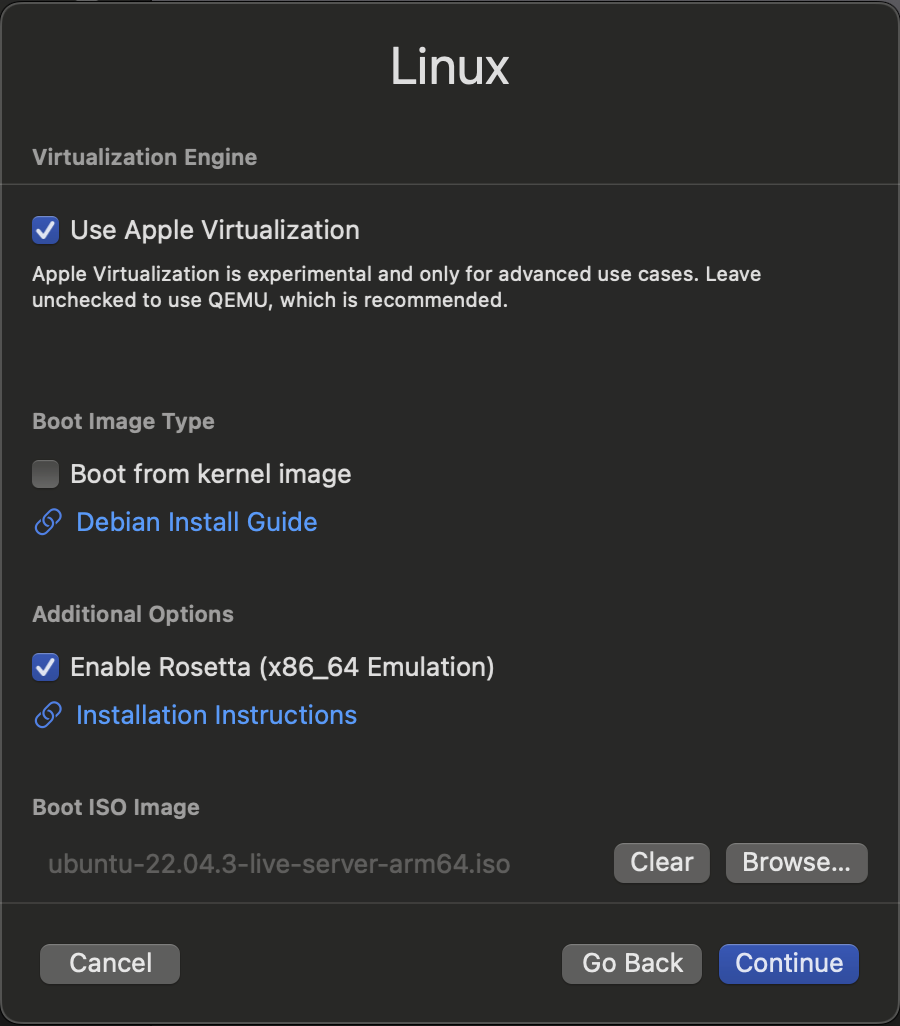
-
For the Boot ISO Image, Browse and Open the downloaded ISO file for Ubuntu.
-
Aadjust the hardware and storage as needed. For a Mac M2 Pro, The default RAM (about 4GB), 8 cores and the default Storage (64 GB) may be used. Shared directories are optional and can be enabled later on.
-
Name to your liking and Save to finish setting up the VM. Click the Play (▶︎) button to start the VM.
Install the desktop GUI for Ubuntu
Follow the instructions in the linked video, to install the necessary packages including the desktop GUI for our Ubuntu VM (if you like it, consider supporting the creator, Ksk Royal):
You might need the commands from the video -
sudo apt update
sudo apt full-upgrade
The following proccess could take a few minutes -
sudo apt install ubuntu-desktop^
And finally -
sudo reboot
Step 2: Enabling Rosetta
To use Rosetta in our VM, we need to (1) Make it Accessible by mounting, (2) Add it to the Filesystem Configuration so the mounting occurs automatically at startup, and (3) Register it as an interpreter to handle binaries with certain formats.
We will follow the instructions in the linked UTM documentation to enable Rosetta.
Make Rosetta accessible through VirtioFS
By doing the following commands in Terminal, /media/rosetta is created to be the mount point for rosetta and the sharing is enabled by VirtioFS -
sudo mkdir /media/rosetta
sudo mount -t virtiofs rosetta /media/rosetta
Add Rosetta to the filesystem table /etc/fstab
By adding the following line to the filesystem table /etc/fstab, the mounting will occur automatically during a new boot thereafter. To edit /etc/fstab, root access is required and you might need sudo and a terminal text editor to your liking.
rosetta /media/rosetta virtiofs ro,nofail 0 0
Register Rosetta using update-binfmts
To use update-binfmts, it might be necessary to install binfmt-support first, with the following command -
sudo apt-get install -y binfmt-support
Next, use update-binfmts to register Rosetta as a x86_64 ELF handler -
sudo /usr/sbin/update-binfmts --install rosetta /media/rosetta/rosetta \
--magic "\x7fELF\x02\x01\x01\x00\x00\x00\x00\x00\x00\x00\x00\x00\x02\x00\x3e\x00" \
--mask "\xff\xff\xff\xff\xff\xfe\xfe\x00\xff\xff\xff\xff\xff\xff\xff\xff\xfe\xff\xff\xff" \
--credentials yes --preserve no --fix-binary yes
At this point, it should be possible to run x86_64 executables with Rosetta if additional AMD64 libraries are not necessary. Optionally, as instructed in the linked post, you may do the Docker Test and check if Docker is able to use Rosetta to run simple x86_64 programs.
Step 3: Enabling the Multiarch and Multilib Support
Although very briefly summarized as just enabling “multiarch” or “multilib” support in the UTM documentation for Rosetta, it is crucial to ensure the x86_64 programs have the required AMD64 libraries and the list of libraries can be software-specific. In this step, we will first update the list of sources for such available packages and add AMD64 as a foreign architecture to Ubuntu’s package manager, dpkg. Then, we will install some essential AMD64 libraries and the specific ones needed by the ADCP suite.
Multiarch: Update /etc/apt/sources.list and add AMD64 as a foreign arch to dpkg
According to the instructions given in the linked repository, update /etc/apt/sources.list by adding the following lines -
deb [arch=amd64] http://archive.ubuntu.com/ubuntu/ jammy main restricted
deb [arch=amd64] http://archive.ubuntu.com/ubuntu/ jammy-updates main restricted
deb [arch=amd64] http://archive.ubuntu.com/ubuntu/ jammy universe
deb [arch=amd64] http://archive.ubuntu.com/ubuntu/ jammy-updates universe
deb [arch=amd64] http://archive.ubuntu.com/ubuntu/ jammy multiverse
deb [arch=amd64] http://archive.ubuntu.com/ubuntu/ jammy-updates multiverse
deb [arch=amd64] http://security.ubuntu.com/ubuntu jammy-security main restricted
deb [arch=amd64] http://security.ubuntu.com/ubuntu jammy-security universe
deb [arch=amd64] http://security.ubuntu.com/ubuntu jammy-security multiverse
Next, configure Ubuntu’s Debian package manager dpkg by adding amd64 as a foreign architecture -
sudo dpkg --add-architecture amd64
And finally, after all the modifications made, don’t forget to update apt, before asking it to install the AMD64 libraries -
sudo apt update
Multilib: Install specific AMD64 libraries for the ADCP suite and AGFRGUI
To begin with, the following is needed prior to pip install the linux-64 packages:
sudo apt-get install -y binutils:amd64
For AGFRGUI, the following packages seem necessary and can be installed by -
sudo apt-get install -y libgl1:amd64 libglu1:amd64 libxmu6:amd64 libxi6:amd64 libdbus-1-3:amd64 libxkbcommon-x11-dev:amd64
sudo apt-get install -y --reinstall libxcb-*:amd64
Step 4: Installing micromamba, the ADCP Suite and reduce
In the last section of this guide, we will install the following items step-by-step:
- micromamba (ARM64)
- the python packages (x86_64) that belong to or needed by the ADCP suite, and
- a recent build of reduce (ARM64) from source, to replace the i386 reduce executable that is shipped with the ADCP suite.
Install micromamba
Following the official installation guide, install the ARM64 micromamba -
curl -Ls https://micro.mamba.pm/api/micromamba/linux-aarch64/latest | tar -xvj bin/micromamba
Then add micromamba initialization to ~/bashrc -
./bin/micromamba shell init -s bash -p ~/micromamba
Lastly, restart terminal or source the modified ~/bashrc to apply changes to the running session -
source ~/.bashrc
Install the ADCP Suite
# Create micromamba Env adcpsuite
micromamba deactivate;
env_name='adcpsuite';
yes | CONDA_SUBDIR=linux-64 micromamba create -n $env_name python=3.7 -c conda-forge --no-rc


# Install Dependent Python Packages
micromamba activate $env_name;
yes | CONDA_SUBDIR=linux-64 micromamba install setuptools=59.8.0 numpy=1.21.6 openbabel=2.4.1 openmm=7.6.0 parmed=3.4.3 mmtf-python=1.1.3 pdbfixer=1.8.1  -c conda-forge --no-rc


# Install AutoDock Python Packages
python -m pip install  Pillow==9.5.0 pyside2==5.15.2.1 pybel==0.15.5 biopython==1.81 pypdb==2.3 wget | grep -v "Requirement already satisfied"
python -m pip install --no-cache-dir  --upgrade adcp adfrcc autosite dejavu2 gle mglutil mslib opengltk prody support volume adfr appframework bhtree geomutils mglkey molkit2 mslibcom pmvapp pyglf utpackages  --index-url https://ccsb.scripps.edu/mamba/pip/py37/ | grep -v "Requirement already satisfied"
python -m pip install --no-cache-dir --upgrade autodocktools  molkit  pybabel --index-url https://ccsb.scripps.edu/mamba/pip/py37/legacy/ | grep -v "Requirement already satisfied"
At this point, it should be possible to launch adfr, agfr and agfrgui normally. However, the residue repair functions in agfrgui expect a working reduce executable at ~/micromamba/envs/adcpsuite/bin/, which is i386 – not currently supported by our VM. Without enabling the additional support for i386 which may be not so worthy, we will make a more recent build from source.
Make program reduce from source
Install make and g++, the default compiler to build program reduce -
sudo apt-get install -y make g++
Then, obtain the source codes from the official repository of reduce -
git clone https://github.com/rlabduke/reduce
Next, simply navigate to the folder reduce, and run make commands with the template Makefile. By default, the executable will be placed under /usr/local/bin/ but these are all customizable with cmake.
cd reduce
make
sudo make install
At this point, you should be able find and use this ARM64 reduce executable. Replace ~/micromamba/envs/adcpsuite/bin/reduce by /usr/local/bin/reduce to support dependent functions in agfrgui -
cp /usr/local/bin/reduce ~/micromamba/envs/adcpsuite/bin/
Incorporate micromamba/envs/envs/adcpsuite/lib into LD_LIBRARY_PATH
At present, agfrgui doesn’t see libraries in micromamba/envs/envs/adcpsuite/lib, unless incorporated in LD_LIBRARY_PATH. Therefore, setting LD_LIBRARY_PATH is neccessary to launch agfrgui -
export LD_LIBRARY_PATH=$HOME/micromamba/envs/adcpsuite/lib
It is recommended to unset or undo the changes to LD_LIBRARY_PATH when not using agfrgui.
Contact
Should you have any questions, comments, or suggestions regarding this post, feel free to reach out by the author’s institute email:
he.1768@osu.edu