Intro
This post is a guide to setting up a Linux virtual machine (VM) with a desktop on Mac computers with Apple Silicon (M1/M2), for the purpose of installing and running the x86_64 programs in the ADFR suite and AutoDockTools (ADT) on such devices.
Apple Silicon uses the ARM64 architecture. Programs that were not built in this architecture cannot be run directly on Macs with Apple Silicon. At present, a common solution to the mismatch of architectures is Rosetta, a compatibility layer that translates software that were built for Intel processors so that they could be run on Apple Silicon. While in some situations, having a Linux VM with Rosetta emulation (not to set up a whole emulator) to run the x86_64 programs may be useful, when:
(1) The program is currently lacking ARM64 support,
and,
(2) Mac OS as the native OS is for some reason (see below and more in Motives of this post) not the preferred platform to run the program, even though in theory the program could be translated by Rosetta and run on Apple Silicon.
The major issue with Mac OS originates from the lack of support for 32-bit software since Mac OS Catalina. With that, programs with 32-bit components will not run on newer Mac OS. Another reason for Linux being the preferred platform over Mac (or Windows) is the differences in multiprocessing on different platforms. With that, the current major version of ADFR/ADCP seems to perform (a lot) faster on Linux than on Windows.
Without setting up a VM, one very elegant walkaround to this is to run the programs in Docker containers with the desired platform and architecture. To run Vina & the python binding, Meeko, or MGLTools & the ADFR suite in Docker images, please consider this user-contributed solution:
https://github.com/Metaphorme/AutoDock-Vina-Docker
The presented guide could be some kind of complementary to the docker solution, for those who wish to use the ADFR suite and perhaps run some lightweight calculations (if you are unsure, check out the performance in Tests with sample data and Compare with running ADCP on native Linux OS) in a VM, to escape from the hustle of privacy & network settings if that cannot be changed for the native OS…
Overview
Following this guide, we will create a Ubuntu VM in UTM with a desktop that serves as the graphical user interface (GUI). The two enabled features of our VM, Apple virtualization and Rosetta emulation, will allow us to install and run the x86_64 programs, including ADFR, AGFR, AGFRGUI, and ADCP, from the current major version of the ADFR suite (v1.0 rc1, as of October 2023), and ADT, from the current major version of MGLTools (v1.5.7).
The procedure generally follows the logic of the UTM documentation on Rosetta, with the addition of installing a desktop GUI and the specific AMD64 (another name for x86_64) libraries for programs in the ADFR suite. Finally, to complete the tasks in the ADCP tutorial the current major version of program reduce is made from source.
Table of Contents
- Step 1: Setting up a Ubuntu VM in UTM
- Step 2: Enabling Rosetta
- Step 3: Enabling the Multiarch and Multilib Support
- Step 4: Installing the ADFR Suite and MGLTools
Step 1: Setting up a Ubuntu VM in UTM
UTM is a free application to create virtual machines on Mac with support for Apple Silicon. Ubuntu is a free & open Linux operating system that we will be using for our VM. To begin with, we will set up a Ubuntu VM in UTM with the desired features to enable Rosetta emulation.
Download UTM and the disk image (ISO file) of Ubuntu-for-ARM
UTM (Version 4.3.5) - https://mac.getutm.app/
Ubuntu (22.04.3-live-server-arm64) - https://ubuntu.com/download/server/arm
Set up the VM from UTM
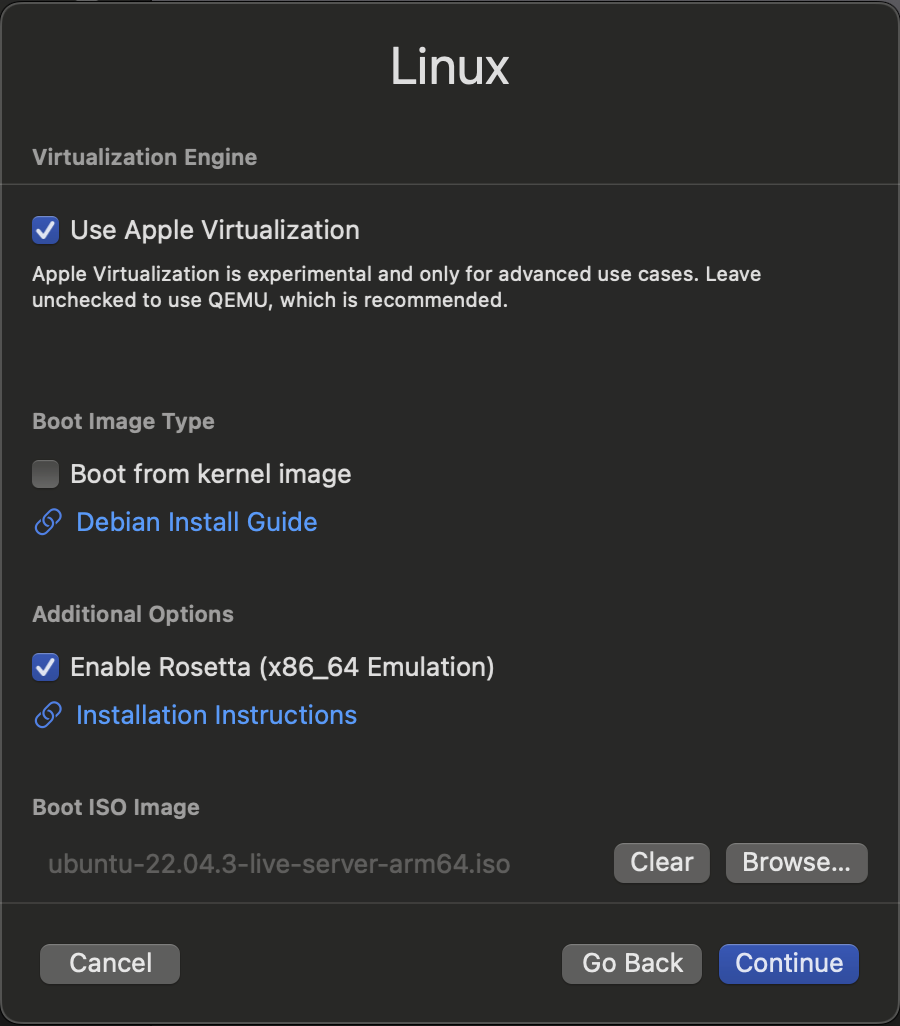
From UTM - Create a New Virtual Machine > Virtualize > Linux.
In the option tabs -
- Turn on the two features: Use Apple Virtualization, Enable Rosetta.
-
For the Boot ISO Image, Browse and Open the downloaded ISO file for Ubuntu.
-
The default Hardware (about 4GB RAM, 4 cores) and half the default Storage (32 GB) may be used. Shared directories are optional and can be enabled later on.
-
Name to your liking and Save to finish setting up the VM. Click the Play (▶︎) button to start the VM.
Install the desktop GUI for Ubuntu
Follow the instructions in the linked video, to install the necessary packages including the desktop GUI for our Ubuntu VM (if you like it, consider supporting the creator, Ksk Royal):
You might need the following commands from the video -
sudo apt update
sudo apt full-upgrade
The following could take a couple of minutes -
sudo apt install ubuntu-desktop^
And finally -
sudo reboot
Step 2: Enabling Rosetta
To use Rosetta in our VM, we need to (1) Make it Accessible by mounting, (2) Add it to the Filesystem Configuration so the mounting occurs automatically at startup, and (3) Register it as an interpreter to handle binaries with certain formats.
We will follow the instructions in the linked UTM documentation to enable Rosetta.
Make Rosetta accessible through VirtioFS
By doing the following commands in Terminal, /media/rosetta is created to be the mount point for rosetta and the sharing is enabled by VirtioFS -
sudo mkdir /media/rosetta
sudo mount -t virtiofs rosetta /media/rosetta
Add Rosetta to the filesystem table /etc/fstab
By adding the following line to the filesystem table /etc/fstab, the mounting will occur automatically during a new boot thereafter. To edit /etc/fstab, root access is required and you might need sudo and a terminal text editor to your liking.
rosetta /media/rosetta virtiofs ro,nofail 0 0
Register Rosetta using update-binfmts
To use update-binfmts, it might be necessary to install binfmt-support first, with the following command -
sudo apt-get install -y binfmt-support
Next, use update-binfmts to register Rosetta as a x86_64 ELF handler -
sudo /usr/sbin/update-binfmts --install rosetta /media/rosetta/rosetta \
--magic "\x7fELF\x02\x01\x01\x00\x00\x00\x00\x00\x00\x00\x00\x00\x02\x00\x3e\x00" \
--mask "\xff\xff\xff\xff\xff\xfe\xfe\x00\xff\xff\xff\xff\xff\xff\xff\xff\xfe\xff\xff\xff" \
--credentials yes --preserve no --fix-binary yes
At this point, it should be possible to run x86_64 executables with Rosetta if additional AMD64 libraries are not necessary. Optionally, as instructed in the linked post, you may do the Docker Test and check if Docker is able to use Rosetta to run simple x86_64 programs.
Step 3: Enabling the Multiarch and Multilib Support
Although very briefly summarized as just enabling “multiarch” or “multilib” support in the UTM documentation for Rosetta, it is crucial to ensure the x86_64 programs have the required AMD64 libraries and the list of libraries can be software-specific. In this step, we will first update the list of sources for such available packages and add AMD64 as a foreign architecture to Ubuntu’s package manager, dpkg. Then, we will install the AMD64 libraries needed by the programs in the ADFR suite and ADT.
Multiarch: Update /etc/apt/sources.list and add AMD64 as a foreign arch to dpkg
According to the instructions given in the linked repository, update /etc/apt/sources.list by adding the following lines -
deb [arch=amd64] http://archive.ubuntu.com/ubuntu/ jammy main restricted
deb [arch=amd64] http://archive.ubuntu.com/ubuntu/ jammy-updates main restricted
deb [arch=amd64] http://archive.ubuntu.com/ubuntu/ jammy universe
deb [arch=amd64] http://archive.ubuntu.com/ubuntu/ jammy-updates universe
deb [arch=amd64] http://archive.ubuntu.com/ubuntu/ jammy multiverse
deb [arch=amd64] http://archive.ubuntu.com/ubuntu/ jammy-updates multiverse
deb [arch=amd64] http://security.ubuntu.com/ubuntu jammy-security main restricted
deb [arch=amd64] http://security.ubuntu.com/ubuntu jammy-security universe
deb [arch=amd64] http://security.ubuntu.com/ubuntu jammy-security multiverse
Next, configure Ubuntu’s Debian package manager dpkg by adding amd64 as a foreign architecture -
sudo dpkg --add-architecture amd64
And finally, after all the modifications made, don’t forget to update apt, before asking it to install the AMD64 libraries -
sudo apt update
Multilib: Install specific AMD64 libraries for the ADFR suite and ADT
For agfr & adfr, the following packages seem necessary and can be installed by -
sudo apt-get install libc6:amd64 libsm6:amd64 libx11-dev:amd64 libxml2:amd64 libgomp1:amd64
With the above, you should be able to install the ADFR suite and run agfr and adfr normally.
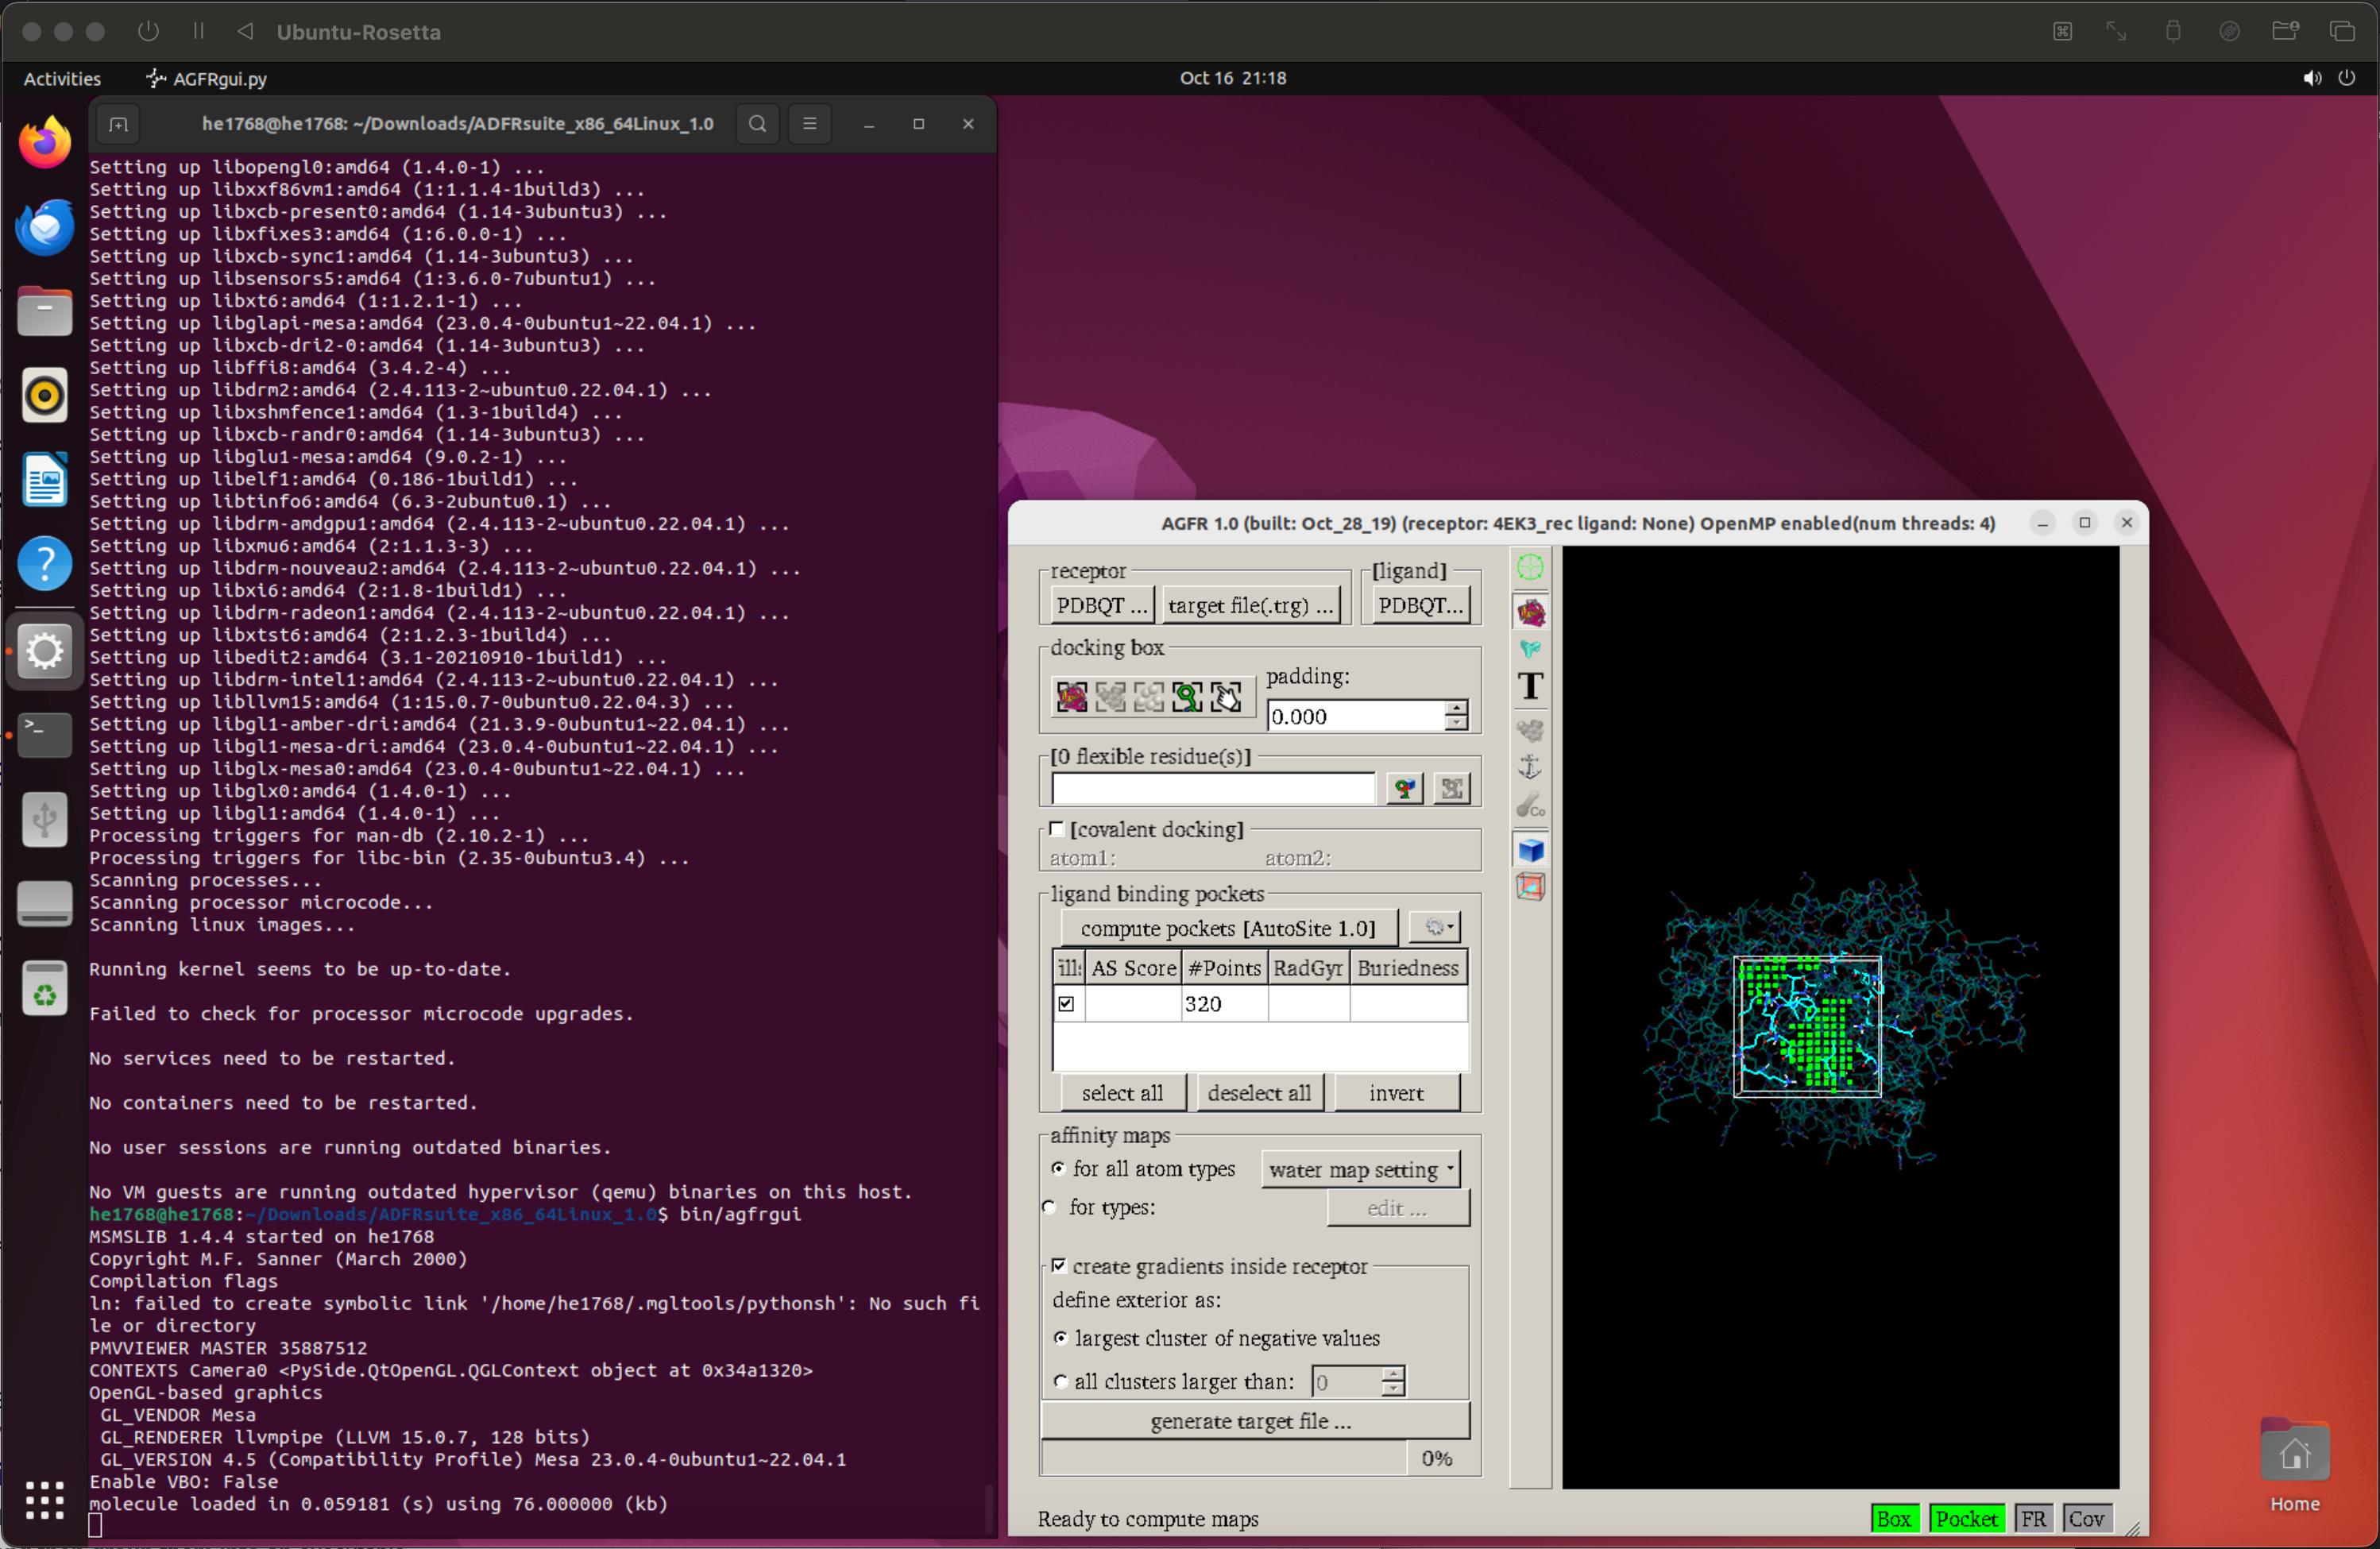
For agfrgui, the following packages can be installed by -
sudo apt-get install libxtst6:amd64 libgl1:amd64 libglu1:amd64 libxmu6:amd64 libxi6:amd64
With the above, you should be able to use agfrgui. At this point, you should also be able to install MGLTools and use adt.

Step 4: Installing the ADFR Suite and MGLTools
ADFR suite (v1.0 rc1 for Linux, tarball installer) - https://ccsb.scripps.edu/adfr/downloads/
MGLTools (v1.5.7 for Linux) - https://ccsb.scripps.edu/mgltools/downloads/
If interested, official tutorials and data files are available for trial calculations at:
For ADFR - https://ccsb.scripps.edu/adfr/documentation/
For ADCP - https://ccsb.scripps.edu/adcp/documentation/
Make program reduce from source
If you also wish to build program reduce from source, the following might be needed prior to the making:
sudo apt-get install cmake
sudo apt-get install gcc-multilib
sudo apt-get install gcc g++
sudo apt-get install python3-dev
Then, obtain the source codes from the repository for program reduce -
git clone https://github.com/rlabduke/reduce
You may simply navigate to the folder reduce, and run the following commands to make it with the template Makefile. By default, the executable will be placed under /usr/local/bin/ but these are all customizable with cmake.
cd reduce
make
sudo make install
At this point, you should be able to complete the tasks in the ADCP tutorial with a recent version of reduce.
Tests with sample data
Below are tables of total time used to complete sample calculations in the tutorials -
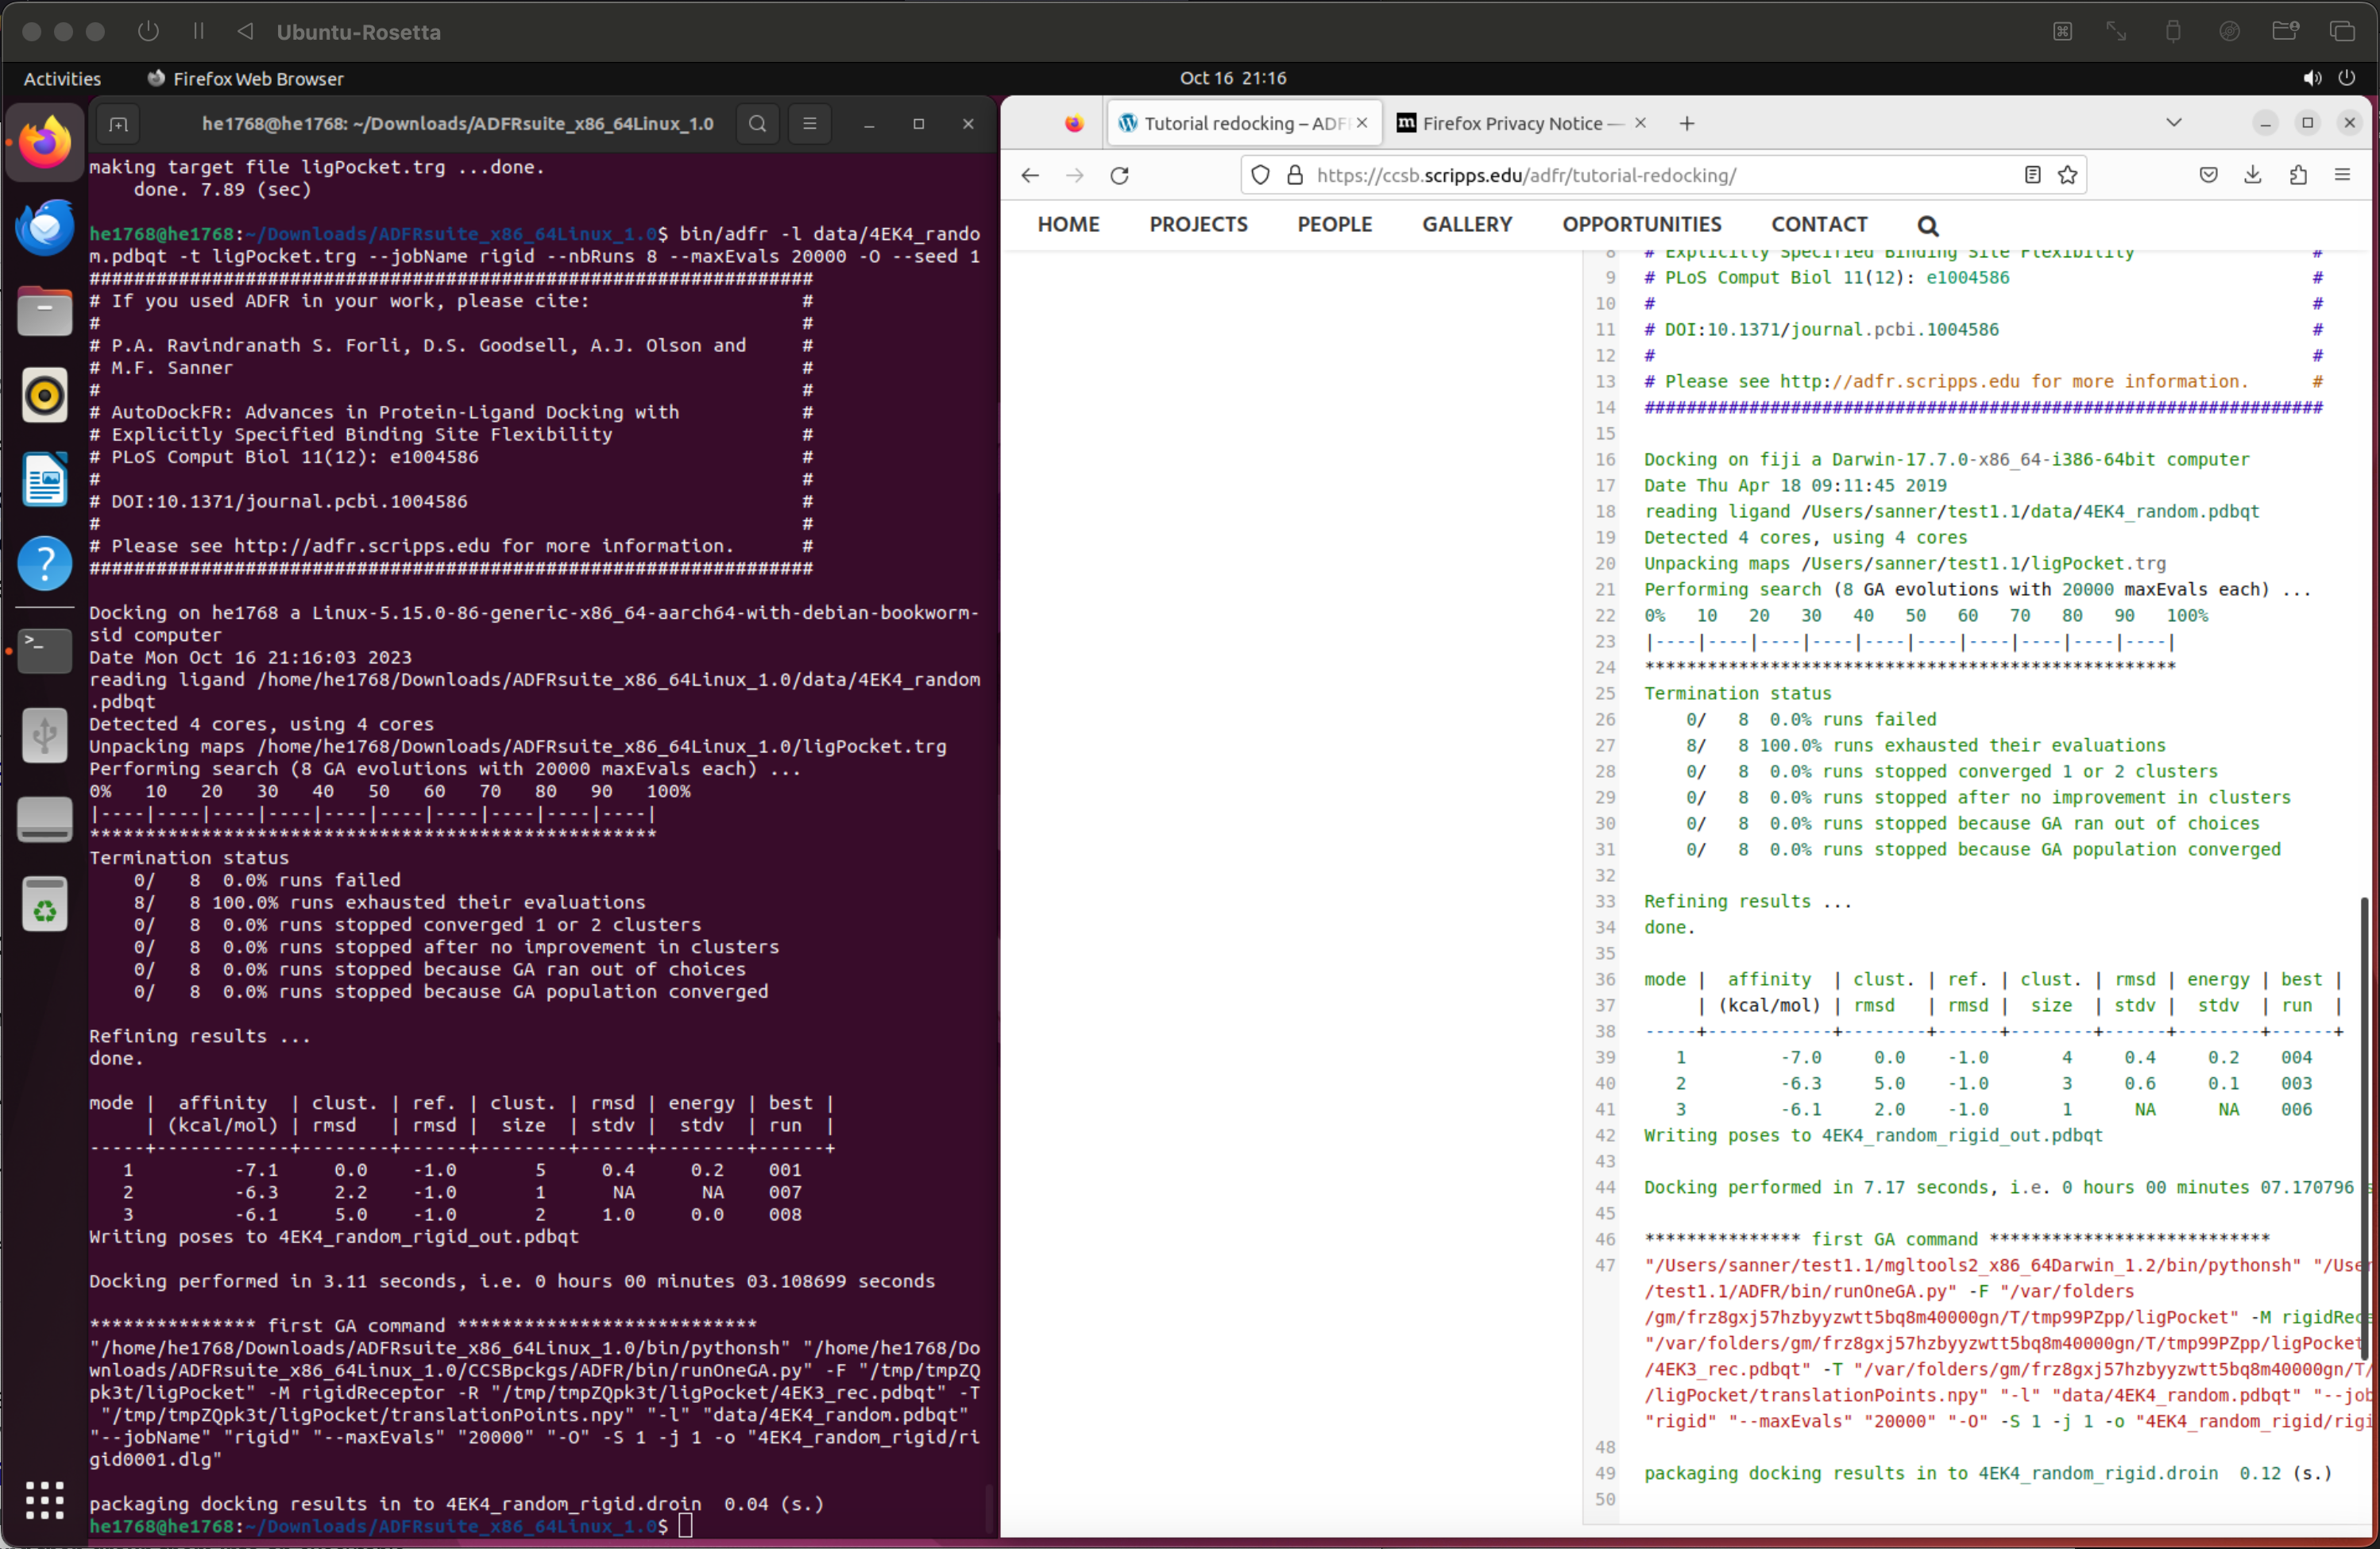
(1) ADFR’s re-docking tutorial
Generate the target file containing the affinity maps
agfr -r data/4EK3_rec.pdbqt -l data/4EK4_lig.pdbqt -o ligPocket
| Process printed | Time used |
|---|---|
| identifying pockets using AutoSite …. | 0.58 (sec) |
| computing maps … | 1.08 (sec) |
| adding gradient to maps | 6.22 (sec) |
| total | 7.89 (sec) |
Dock the randomized ligand using the generated target file
adfr -l data/4EK4_random.pdbqt -t ligPocket.trg --jobName rigid --nbRuns 8 --maxEvals 20000 -O --seed 1
| Process printed | Time used |
|---|---|
| Docking performed in | 3.11 (sec) |
(2) ADCP’s re-docking tutorial
Generate the target file containing the affinity maps
agfr -r 3Q47_recH.pdbqt -l 3Q47_pepH.pdbqt -asv 1.1 -o 3Q47
| Process printed | Time used |
|---|---|
| identifying pockets using AutoSite …. | 2.90 (sec) |
| computing maps … | 2.25 (sec) |
| adding gradient to maps | 19.70 (sec) |
| total | 23.36 (sec) |
Dock the peptide from sequence using the generated target file
adcp -t 3Q47.trg -s npisdvd -N 20 -n 1000000 -o 3Q47_redocking -ref 3Q47_pepH.pdb
| Process printed | Time used |
|---|---|
| Docking performed in | 179.30 (sec) |
For the above calculations, 4 cores & max. 4 GB RAM were allocated to the VM built by the presented procedure. The device used is Apple M1 Pro (16-inch, 2021).
Compare with running ADCP on native Linux OS
Below is a bit of benchmark timing I did to compare the performance of the UTM VM to running ADCP on native Linux OS. The reference Intel hardware is Intel(R) Xeon(R) CPU E5-2680 v4, accessed through the Ohio Supercomputer Center’s Owens cluster.
Re-docking the 7-mer
adcp -t 3Q47.trg -s npisdvd -N 1 -n 21000000 -o 3Q47_redocking -ref 3Q47_pepH.pdb
| UTM VM | Owens sinteractive |
|---|---|
| 491.39 (sec) | 644.72 (sec) |
Re-docking a 5-mer
adcp -t 3Q47.trg -s isdvd -N 1 -n 15000000 -o 3Q47_redocking -ref 3Q47_5merH.pdb
| UTM VM | Owens sinteractive |
|---|---|
| 229.03 (sec) | 312.35 (sec) |
Notes
- On Owens, running the docking job through sinteractive (interactive computing) or in batch takes equal amount of time.
- The timing of a single GA run is generally invariant with number of cores allocated to the job. When
-Nis larger than 1, the GA runs may be distributed across several cores. If you are running it in a VM or Docker, the performance may also depend on the virtualization. - The
-nnumber is the upper bound of steps, so the timing may be related to, but isn’t proportional to-n. The timing for a single GA run is generally invariant with number of allocated cores.
Motives
The ADFR suite is developed by the Sanner lab in the Center for Computational Structural Biology (CCSB) at Scripps Research. It has been tremendously useful for our group research in providing a set of tools to streamline, automate, and customize the docking routine. I am no longer actively involved in research projects that use AutoDockFR. However, there has been a considerable amount of unpublished work and efforts that we, together with several lab alumni, put into constructing a docking pipeline with ADFR that is specific to the biological system of our interest.
The guide is written with the hope of helping our junior students get a smooth start with the ADFR suite, run some interactive trial calculations before deploying their production jobs on the supercomputer, and hopefully carry on some of our work in the future. In particular to students who are assigned to a university-owned Mac with Apple Silicon, having a Linux VM on it provides a great lot of freedom to install software they want for research.
Contact
Should you have any questions, comments, or suggestions regarding this post, feel free to reach out by the author’s institute email:
he.1768@osu.edu